Shower Steamer Shampoo Bar ROUND - 3D Printed Bath Bomb Mold
PM-3D-SHWR-STMR-SHMPOO-RND-BB
Creating professional-quality shower steamers and pressed shampoo bars is now simpler than ever with our 3D-printed bath bomb mold set, meticulously crafted from high-quality, recyclable PETG plastic. This material stands out from the commonly used PLA plastics, offering unmatched durability and resilience. Each mold is designed to withstand the rigors of frequent use without the wear and tear typical of lesser materials.
Our molds are crafted for professional quality, efficiency, and ease of use, featuring an expertly engineered design that ensures effortless release and consistent results. Whether you’re a novice crafter or an experienced formulator, our molds provide a reliable solution for creating luxurious bath bombs that rival top brands and are as enjoyable to make as they are to use or sell.
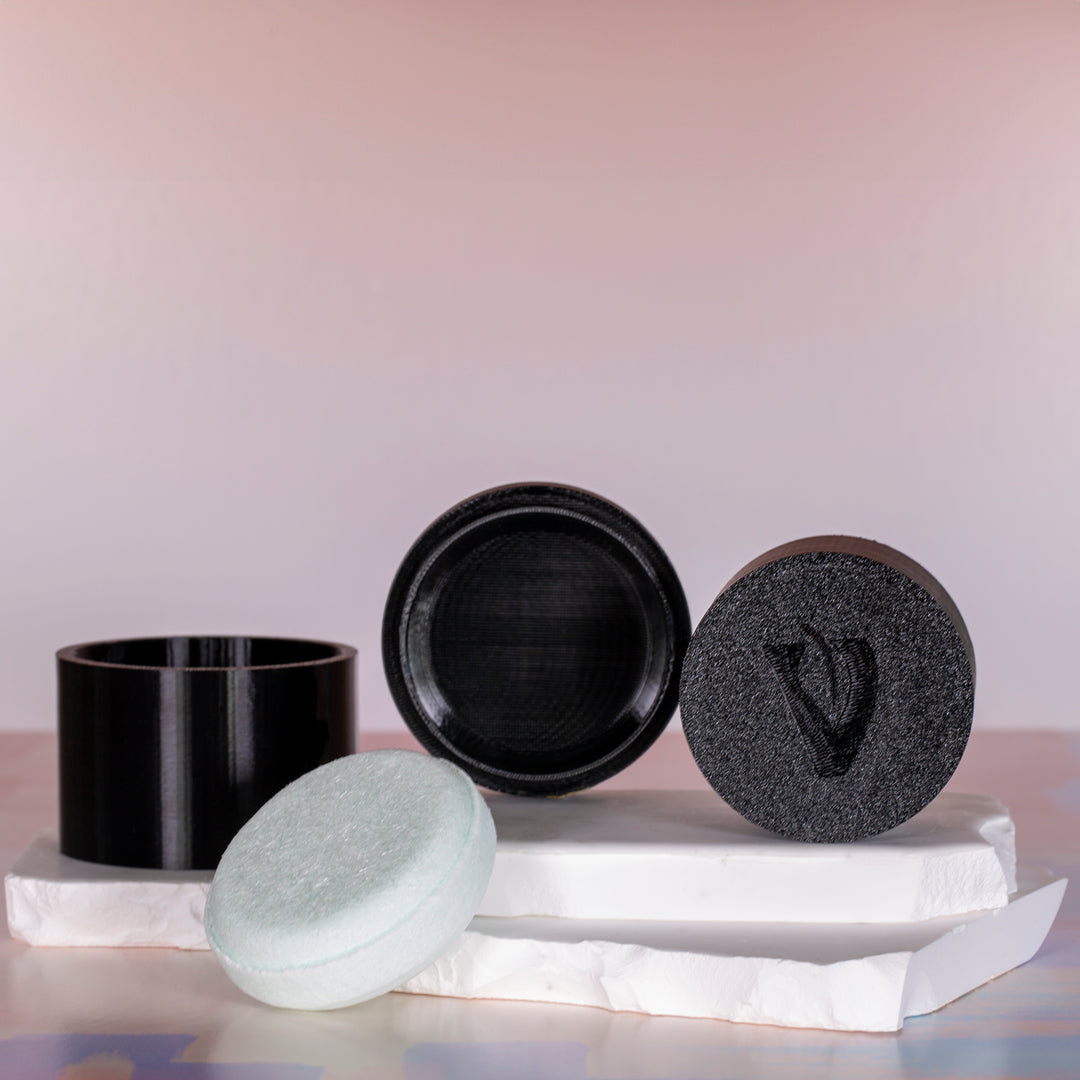
Each 3 piece set includes a top mold with an embossed Voyageur logo, which cleverly indicates the top of your bath bomb, especially useful when working with embeds, a bottom mold, and a sleeve for versatile, professional crafting.
Note: The Embossed Voyageur Logo will not appear on the finished product.
How to Use 3D Printed Bath Bomb Molds
1. Prepare the Mold:
- Ensure your sleeve is on a flat surface, such as a table.
- Put the bottom piece of the mold into the outer sleeve.
2. Fill the Mold:
- Fill the mold up to the top of the sleeve with your prepared bath bomb mixture. Do not pack it in tightly; just level it off.
TIP: If you want to place items like dried flowers or coarse salts in your bath bomb, and have them visible at the top of the finished product, use the mold half with the embossed Voyageur Logo in the bottom of your sleeve. First, sprinkle the flowers or salt into this mold half before adding the bath bomb mix. The embossed logo (the "V") will help you identify which side of the bath bomb will have the embeds.
3. Compress the Bath Bomb:
- Place the top half of the mold into the top of the sleeve and press down firmly to compress the two halves together and to create a tight seal.
4. Remove from the Mold:
- Gently move the sleeve up and down to help release the bath bomb. There may be a bit of suction between the sleeve and the mold halves, which can be easily relieved by tapping the sides of the sleeve with the back or side of a metal spoon.
- Once you tapped a few times against all sides,
place mold on the table and push the sleeve up to remove.
5. Release the Bath Bomb from the 2 halves:
- After removing the sleeve, use your thumb or index finger to smooth out the exposed ring of the bath bomb.
- Gently tap the top part of the mold with the side of a metal spoon while firmly holding the mold to break the suction.
- Carefully pull the top part of the mold diagonally upward to remove it.
- Next, while gently holding the exposed part of the bath bomb, turn it upside down and place it over the Sphere Drying Tray or a piece of bubble wrap.
Repeat the process to remove the bottom half of the mold from the finished bath bomb.
6. Dry and Package:
Lay the shower steamer or shampoo bar onto a flat surface, such as a piece of cardboard for 24 hours to fully dry before packaging.
Design: 3D Printed
3D Molds feature subtle striations, which are a natural part of the manufacturing process. Rest assured, these will not affect the quality or appearance of your finished product.
Material: Recyclable PETG Plastic
Mold Dimensions: 2.5" Diameter
Care Instructions for 3D Printed Bath Bomb Molds
Thank you for choosing our 3D printed bath bomb molds, made with recyclable PETG plastic. PETG offers excellent durability and chemical resistance, making it an ideal choice for crafting the highest quality bath bombs.
Here’s how to maintain your 3D Printed PETG molds:
1. Cleaning: To clean the molds, simply wipe them with a damp cloth, or hand wash with minimal water. Do not submerge molds in water or place in the dishwasher, as PETG is best maintained with minimal water exposure.
2. Drying: After wiping, allow the molds to air dry completely before storing. This step is crucial to prevent any moisture buildup, which could affect the mold's integrity and possibly activate your bath bomb during production.
3. Storage: Store the molds in a cool, dry place away from direct sunlight. PETG is UV resistant, but prolonged exposure to sunlight can degrade any plastic over time.
4. Handling: Handle the molds carefully to avoid any damage. PETG is impact resistant, which makes it less likely to crack or break compared to other plastics, such as PLA, but it is still best to avoid rough handling.
5. Temperature: Keep the molds away from high temperatures; PETG can withstand higher temperatures than many other plastics, such as PLA, but it is still best to avoid environments hotter than 75°C (167°F).
6. Usage: Use the molds for their intended purpose. PETG's strength and flexibility make it suitable for regular use without fear of deformation under normal conditions.
7. Chemicals: PETG is highly chemical resistant, making it safe to use with a variety of dyes and essential oils commonly used in bath bomb production.
By following these care instructions, you can ensure the longevity and performance of your 3D printed bath bomb molds, while also benefiting from the robust and versatile properties of this eco-friendly, recyclable material.


